
한 걸음

인강이나 다른 포스팅들에서 설정하라는대로 했는데zsh: command not found: flutter메시지가 뜨며 플러터를 찾지 못하는 현상 발생.. 나의 설치 환경맥 M1 칩 / Sonoma 14.4.1 터미널에서 아래 명령어 입력해서 zshrc 파일 열기(블로그 포스팅 시기에 따라 zshenv를 열라는 글도 있었고.. 헷갈림)open ~/.zshrc 참고로 programs는 내가 만든 커스텀 폴더임export PATH="$PATH:/Users/dayoung/Desktop/programs/flutter/bin" 아래 명령어를 입력해서, 위에서 수정한 새로운 내용을 터미널에 반영하기source ~/.zshrc 아래 명령어를 입력해서 버전이 제대로 뜨는지 확인flutter --version

서비스 내에서 회원만 이용 가능한 기능이 있다면, 아래와 같이 로그인 페이지로 이동할 수 있는 모달을 띄워준다. 사용자가 저 버튼을 클릭해서 로그인을 하고 난 뒤, 원래 보고 있던 페이지로 돌아올 수 있도록 해야 한다. import { usePathname, useRouter } from 'next/navigation';const router = useRouter();const pathname = usePathname();...router.replace('/login?redirect=' + pathname); 간단하게는 위와 같이 구현할 수 있다. 하지만 만약 검색 페이지라서, 복잡한 필터기능이 있고 searchParams가 주소 뒤에 줄줄 많이 달려있는 상황일 수도 있다. UX 관점에서1. 사용자가..

'공유하기' 동작을 하는 버튼이 여기저기서 쓰여 공통 컴포넌트로 만들었는데,이게 때에 따라 [버튼]이기도, [아이콘]이기도 해야했다. 아래와 같이 컴포넌트, 자체를 넘겨받아 렌더링해줄 수 있도록 했다. import { usePathname, useSearchParams } from 'next/navigation';import Button, { ButtonProps } from '@/components/commons/Button';import { toast } from 'react-toastify';import { ComponentProps, ElementType, ReactNode } from 'react';type Props = { as?: T; // 동적으로 렌더링할 컴포넌트 children?..
쓸 때마다 까먹네... 'use client';import React, { createContext, useContext, useState } from 'react';const SellContext = createContext void; } | undefined>(undefined);export const SellContextProvider: React.FC = ({ children,}) => { const [name, setName] = useState(''); return ( {children} );};export const useSellContext = () => { const context = useContext(SellContext); if (!conte..
// useLocalStorage.tsimport { useState, useEffect, useCallback } from 'react';function useLocalStorage(key: string, initialValue?: T) { const [storedValue, setStoredValue] = useState(() => { if (typeof window === 'undefined') { return initialValue; } try { const item = window.localStorage.getItem(key); return item ? JSON.parse(item) : initialValue; } catch (error) { ..
npm library를 만들어서 배포했는데, 빌드 결과물인 index.es.js 파일에 숨기고 싶은 URL이 포함되어 있었다.빌드 난독화를 해도, env파일에 변수를 넣어도 드러나는 건 당연히 그대로다. (이게 노출된다고 해서 엄청 크리티컬 하진 않지만, 너무 적나라하게 드러나는 것이 불편한 상황) // .envVITE_SOCKET_URL=https://숨기고싶다.com// socketInstance.tsconst url = import.meta.env.VITE_SOCKET_URL;...class SocketInstance { private static instance: SocketInstance; public socket: Socket; private constructor() { // env..
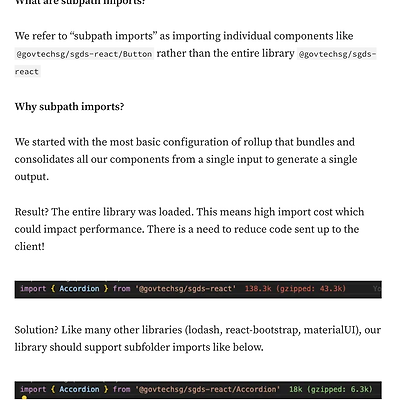
아래와 같이 .../util 과 같은 형태로 import 해올 수 있도록 하는 걸 sub path module 라고 한다.(처음에 뭐라고 칭해야하는지 몰라서 검색하는데 애를 먹었음)import { customUtil } from 'my-library/util'; * subpath를 사용하는 이유 sub path 설정을 위해 살펴봐야할 부분들1) index.ts (배럴 파일들) => 빌드될 대상2) vite.config.ts => 빌드 결과물 설정3) package.json => 외부 프로젝트에서 import 해오는 방식 설정 package.json 파일에 exports 부분을 아래와 같이 작성해주면,외부 프로젝트에서 import { } from 'library/util'; 과 같이 가져다 쓸 수 ..
// iconList.tsxconst iconList = { search: ( ),...}export default iconList // Icon.tsximport { SVGAttributes, forwardRef } from 'react';import iconList from './iconList';import theme from 'styles/theme';type IconProps = { name: keyof typeof iconList; size?: number; color?: keyof typeof theme.colors;} & SVGAttributes;const Icon = forwardRef(function Icon( { name, size = 24, color, ...pro..
내가 만든 custom input에는 기본 input에 내장되어있는 attributes(ex. value, onChange, placeholder...)에내가 정의한 추가요소(ex. size, color, align...)이 덧붙여져야 한다. 이 때, 기본 내장 attributues의 type을 가져오는 코드는 다음과 같다. import styled from 'styled-components';import { InputHTMLAttributes } from 'react';interface InputProps extends InputHTMLAttributes { size?: 24 | 32;}const Input = (props: InputProps) => { return ;};export default..